Rachel Absher, a wedding and portrait photographer from Central Florida, was kind enough to give me a shout out on a recent blog post where she featured photos that included my cake bunting. Here is one that she shared with me - it has such a gorgeous vintage feel. You just have to take a look at the rest of the pics from this adorable tea-party themed first birthday. She is truly talented at capturing the fun of such special occasions :)
Showing posts with label tea party. Show all posts
Showing posts with label tea party. Show all posts
Featured Photographer: Rachel Absher
Wednesday, February 13, 2013
Labels:
birthday,
bunting,
cake topper,
photography,
pink,
tea party
Photo Friday: Tea Party
Friday, October 26, 2012
To throw the perfect tea party all you need are some mini sandwiches, sweets on tiered trays, and of course, a few different flavors of tea. It doesn’t hurt to throw in some fun props for your guests to get into character. Here are some photos from a tea party we held at our home. It was such a lovely event! We brought out all of my mom’s vintage china, and decorated hats with flowers and feathers for photo props. Try some long gloves and pearls for your guests as well.
We made nine varieties of sandwiches, these were the fillings we used:
Carrot-Ginger (carrots, cream cheese, ginger)
Green olive & cream cheese
Cucumber & cream cheese
Sun-dried tomato butter
Celery-Nut (cream cheese, celery, walnuts)
Cheddar- chutney (chutney, grated white Cheddar, cream cheese, cilantro)
Minted radish (lemon zest, mustard, mint, radishes, butter)
Watercress & goat cheese
Tomato & basil butter
Each table had a teapot with a selection of teas, from Earl Grey and black teas to mint and chamomile. There was certainly a large assortment of food and teas at this party but don’t be overwhelmed. This was for a larger event and even a few simple (say 3 or 4) sandwich fillings and dessert options (or even a cake) would suffice if you would like to have your own. There is nothing more fun than a high tea afternoon. Pinkies up, everyone!
xoxo,
Amalia


Labels:
photography,
tea party
Treasury Time: Won't You Come to Tea?
Friday, October 26, 2012
Wouldn't you love to be invited to a tea party? I just adore them, especially ones that are Victorian inspired! Ladies in flowered hats, vintage china, and dainty desserts and tea sandwiches...how elegant!
$68.00
|
$35.00
|
$17.00
|
$120.00
|
$58.00
|
$50.00
|
$7.00
|
$14.50
|
$30.00
|
$6.00
|
$25.00
|
$12.00
|
$2.00
|
$90.00
|
$15.75
|
$38.00
|
Treasury tool supported by the dog house
Labels:
bridal shower,
etsy,
party decor,
pastel,
pink,
tea party,
treasury,
victorian
DIY Handbag Centerpieces
Tuesday, August 21, 2012
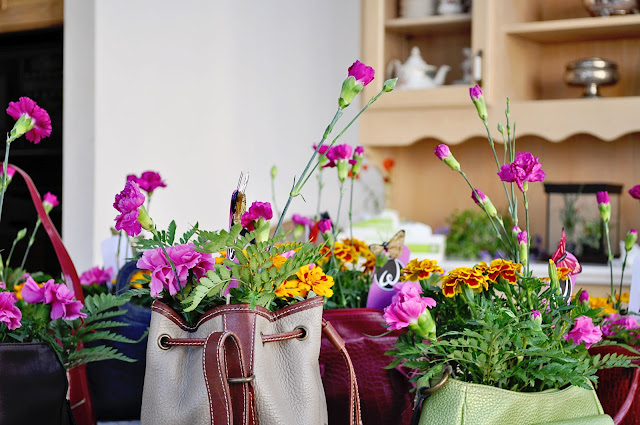
Today I thought I would post this centerpiece idea, which I did for an event back in June. It's easy to do and is perfect for an ladies' lunch, afternoon tea party, or bridal shower. For each centerpiece, you'll need a handbag, a gallon size Ziploc bag, and a potted plant about the size of the handbag (I chose marigolds). I made the centerpieces using handbags donated for the event, but you can pick up inexpensive ones at a thrift store. The best ones to choose are those with a flat bottom, as they sit better on a table top.
Depending on how full you want your arrangement to look and how many centerpieces you need, you will also need a bouquet or two of cut flowers and some greens. I used carnations, as they seem to be quite hardy, and a bunch of ferns. Finally, you will need a watering can with a long spout.
To make the centerpieces, simply put the potted plant into the Ziploc bag and place it into the handbag. Tuck in the plastic bag if it is sticking over the edges. Then cut the flowers from your bouquet at varied heights and gently push the stems into the soil of the potted plant. Same with the ferns. Make sure that the stems are secure in the soil so they don't move around or fall out of the arrangement. Once you are finished, take care watering the soil with the watering can - the plastic bag should prevent any leaks, but just make sure the water is going directly into the pot, and don't overwater.
To finish it off, I hot glued a tag with a logo to a wooden dowel, then added a butterfly to make it look like it just came in from the garden! You could customize the tag with a table number or whatever else you like, or just skip this step entirely. Either way they're so lovely!
Labels:
bridal shower,
centerpiece,
DIY,
flowers,
tea party
Subscribe to:
Posts (Atom)


